Deploy .NET Core web application using GitHub Actions
I wanted to try out using GitHub Actions to deploy a .NET Core web application to Azure. Microsoft already has some actions available to accomplish this, so this should be rather straightforward 😄. I haven’t really played with GitHub Actions yet, so this should be rather informative 😁. Usually I do this using Azure DevOps, so this will be a nice way to check the other side of the fence.

Photo by Emre Karataş
Starting off
For starters, I want to have a small web application that would be similar to something I could already have running in a regular Azure App Service with a CI/CD pipeline in Azure DevOps. To create something I used these steps:
- Create a new repository on GitHub link.
- Clone it to a local folder on my laptop
- Move into the new directory
- Run
dotnet new webapp - Update the
.gitignorefile - Commit the first version of the code
- Push into the remote on GitHub
For testing how the new application worked and if it could be run I used these commands:
dotnet restore
dotnet build
dotnet run
GitHub Actions
To get started with GitHub Actions (do scroll on that site, or you will miss a lot of good stuff!) I had to join the Beta program and from then on I had an ‘Actions’ tab available on all my repositories. Note: the beta for GitHub Actions ends somewhere in November 2019.
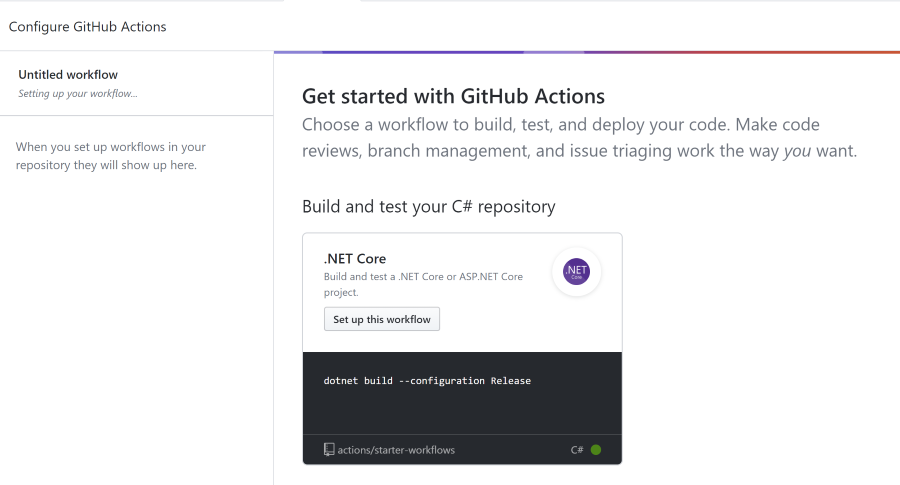
Clicking on ‘Actions’ on a repository on GitHub analyzes your repo and proposes a starter yaml file to use, based on the code they found in the repo. On mine, they correctly found some .NET code:
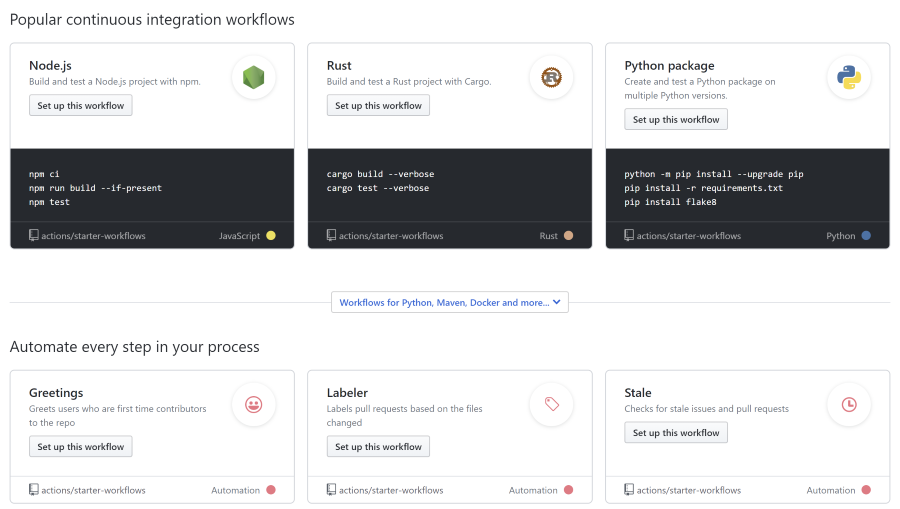
There are a lot of actions available already, as are other setup possibilities to get you started, regardless of your stack:
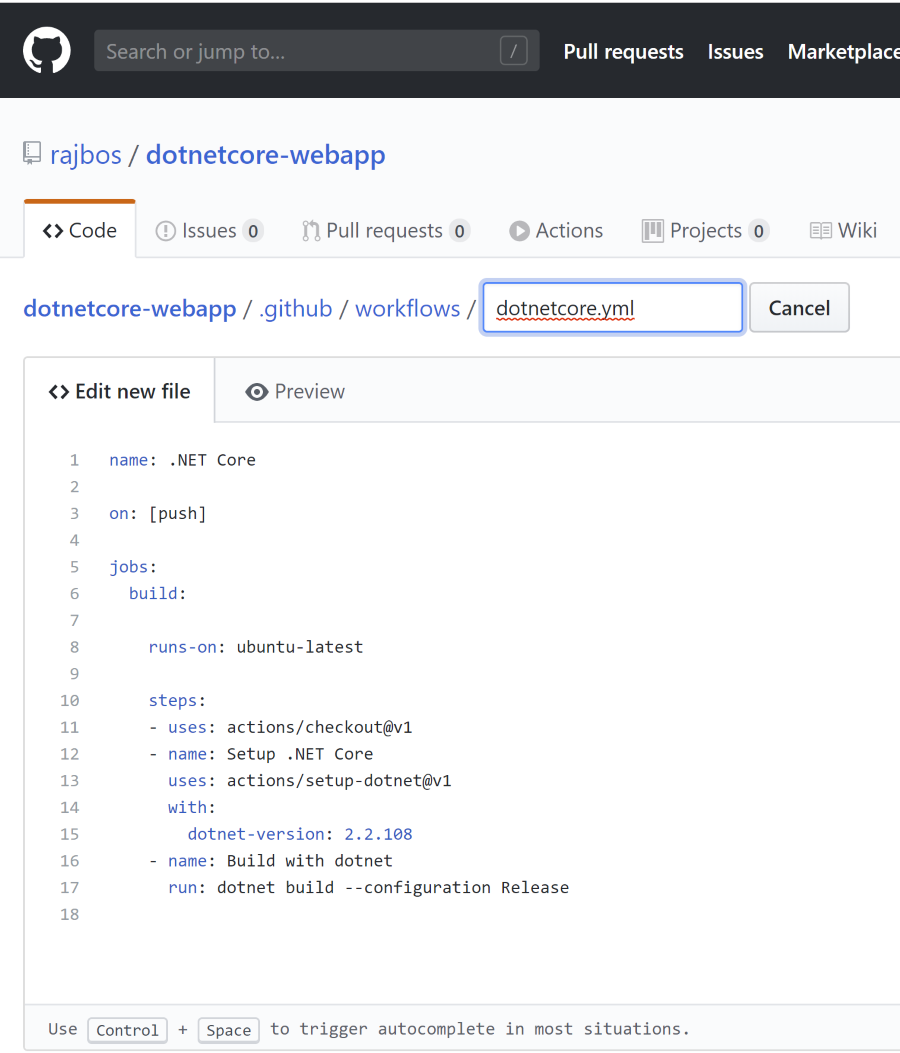
The yaml file that you create is a set of actions to run after each other (some parallelization is possible) and is called a workflow.
.NET Core set up
I picked the suggested setup since it matched the .NET Core project I wanted to deploy into Azure. You can see that there are steps to set up the Action runner with the tooling it needs to build a .NET Core project and then we start a build with the dotnet commands.
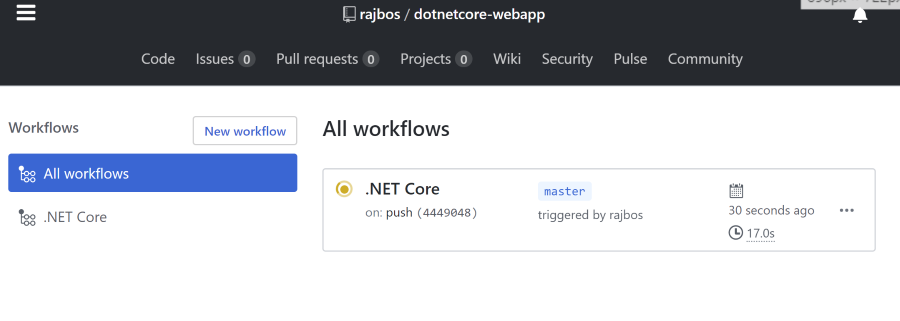
After saving the yaml file it will be committed to your repository and this will kick off a run, since it the trigger for this ‘workflow’ is on: push. You can see the commit ID that is associated with the push, as well as the branch and the account that pushed the changes:
First run
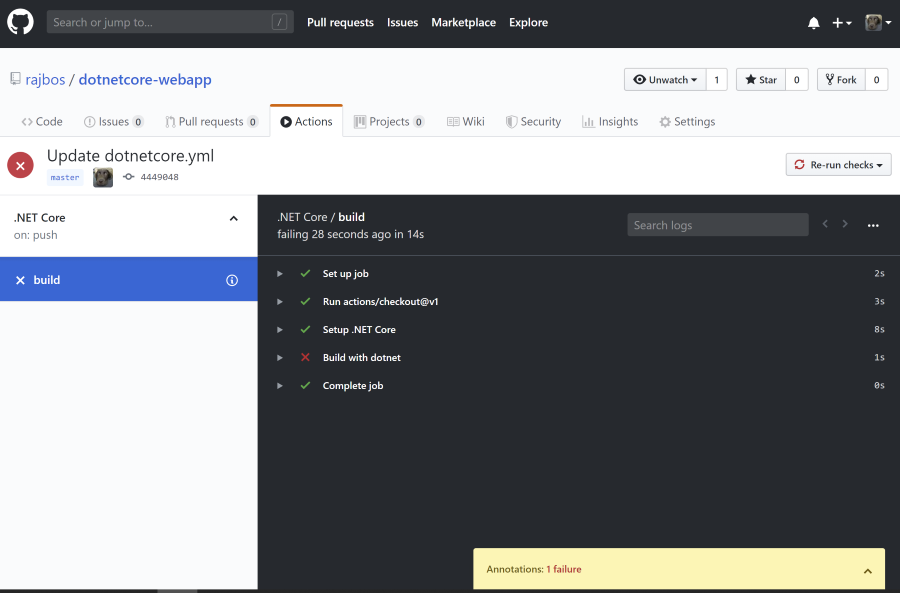
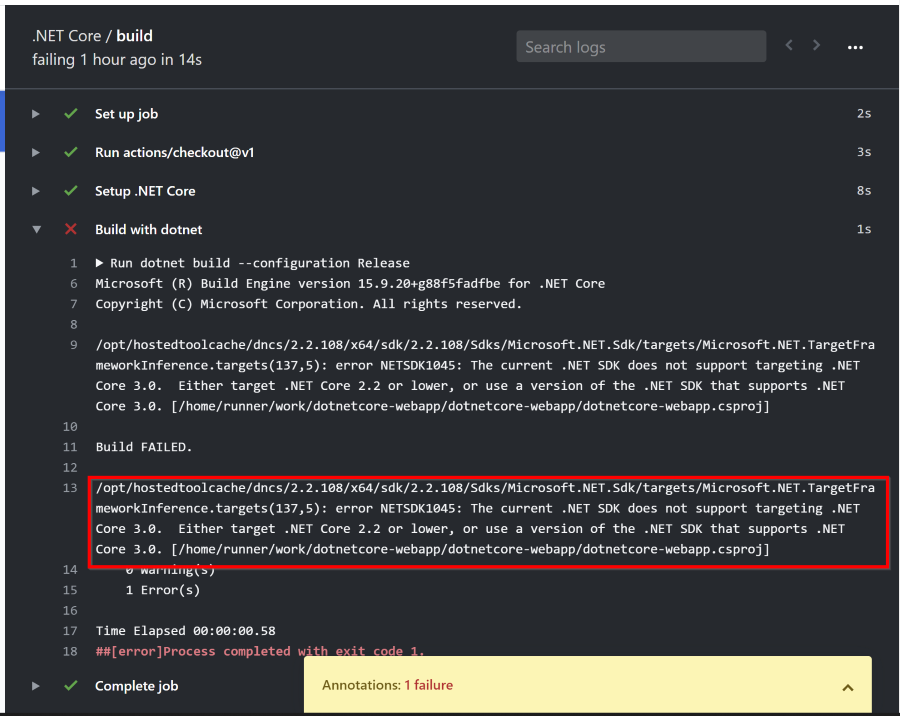
The first run I start reported an error. See the screenshot below for the message detail. This is already a good start: it clearly states what is wrong, as well as where! I am running the latest [].NET Core 3.0](https://dotnet.microsoft.com/) bits on my machine and the default yaml template uses the 2.2 version! I naively changed that to use 3.0, but that run failed as well: you need to use the full SDK version, so 3.0.100 did the trick.
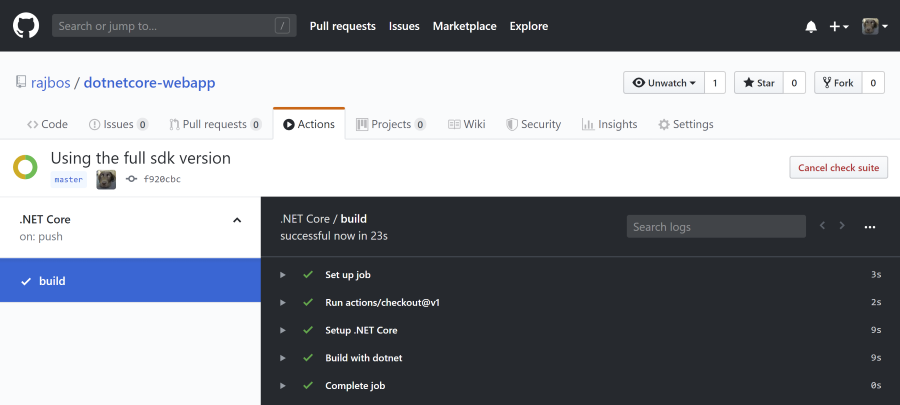
First working run result: nice and fast!
 Also some things that stand out: the GitHub site doesn’t automatically show new runs on pushes and you cannot get back to the list of runs to switch to a previous run for example: you can click the ‘Actions’ tab again to start on the top-level of the ‘Workflows’ overview: it is possible to have multiple workflows in the same repository (handy!). The rest of the UI does look great though!
Publishing to Azure App Service
To be able to publish the web app to an Azure App Service I create a new App Service on an existing App Service Plan. I found some documentation on using GitHub actions from the App Service team, so I tried that out first. The examples are specific to running a docker container on the App Service, or a Java, Javascript or Python application. Surely, this will work for .NET Core as well?
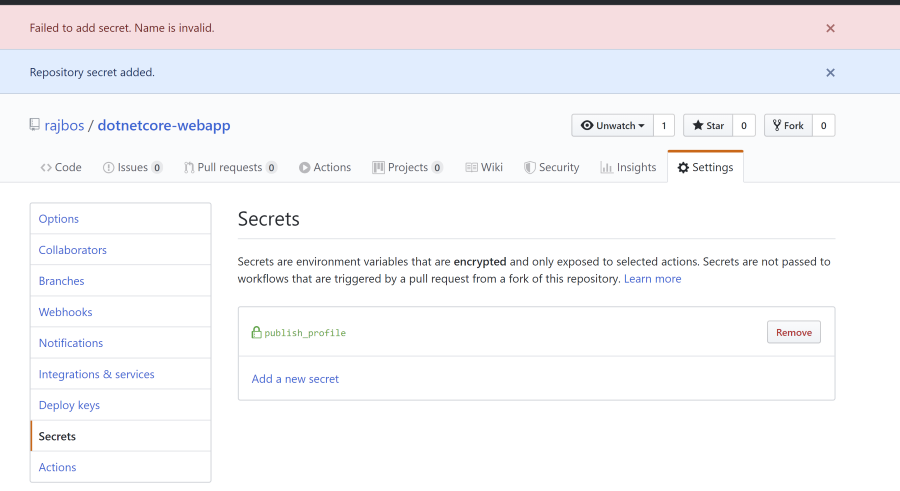
To prepare your repo, download the publish profile for the App Service and store it in a GitHub Secret. Here is some strange UI as well: I used the secret name from the documentation I was following and it contained a dash between the words. This is not a valid secret name, so GitHub will show you an error. Adding the correct name (I changed it to an underscore) shows a green notification. This UI can be confusing: which message belongs to which values? Maybe the could add the secret name that you where trying or at least a timestamp to it?
Just adding this step in the yaml file ran the workflow again and indicated a warning: this space is moving so fast as it is just a couple of months old! The warning states that the action I am using is already deprecated: I need to use a different one!
##[warning]This action is moved to azure/webapps-deploy repository, update your workflows to use those actions instead.
To bad this warning doesn’t include a link to the correct repository. Luckily the name of the action is also its path after GitHub.com: https://github.com/azure/webapps-deploy. Scrolling through the repository shows even more example yaml files to use! For .NET Core the example can be found here.
Do note that this also adds a publish step: I forgot that one initially!
By now my mail application has caught up as well: on each failed run, GitHub sends you an email message to make sure you know something is not right 😄.
Do note you can change that behavior on your profiles settings, but not on a per project basis.
Complete workflow
By now I have the current workflow that is running as I want it to:
name: .NET Core

on: [push]

jobs:
  build:

    runs-on: ubuntu-latest

    steps:
    - uses: actions/checkout@v1
    - name: Setup .NET Core
      uses: actions/setup-dotnet@v1
      with:
        dotnet-version: 3.0.100

    # dotnet build and publish
    - name: Build with dotnet
      run: dotnet build --configuration Release
    - name: dotnet publish
      run: |
        dotnet publish -c Release -o dotnetcorewebapp
    - name: 'Run Azure webapp deploy action using publish profile credentials'
      uses: azure/webapps-deploy@v1
      with:
        app-name: dotnetcorewebapp19 # Replace with your app name
        publish-profile: $ # Define secret variable in repository settings as per action documentation
        package: './dotnetcorewebapp'
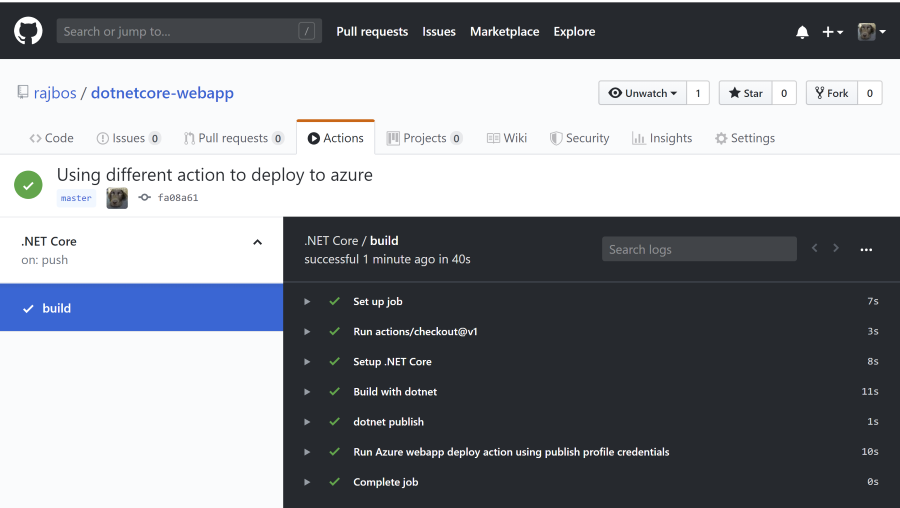
And with that setup I have my first successful run!
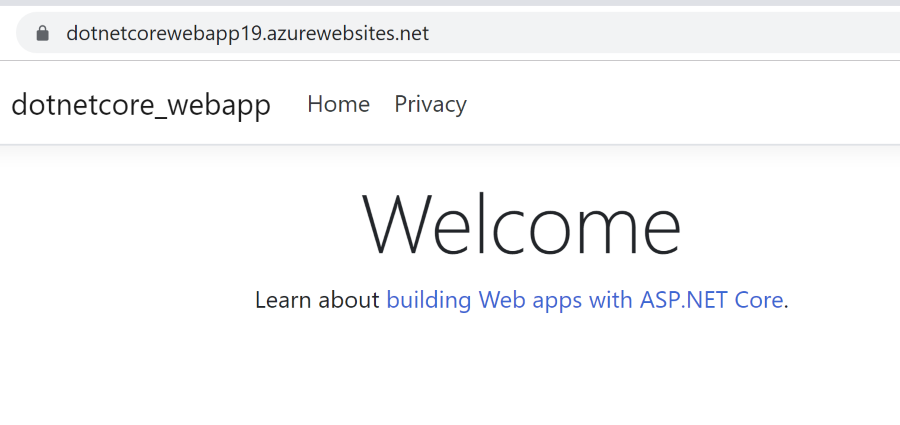
You can now browse to the website and see if it is running:
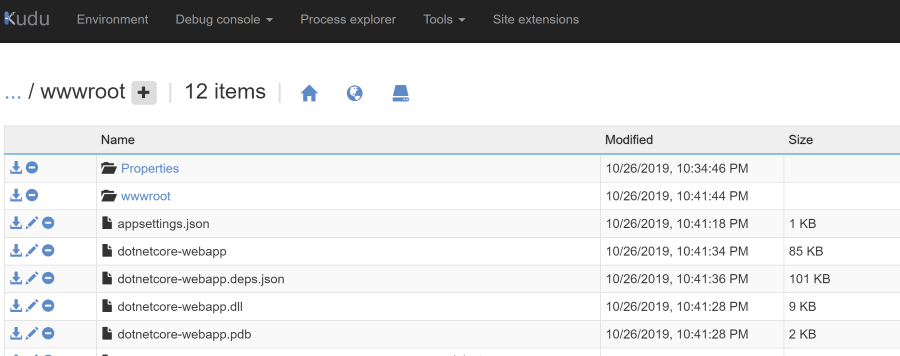
To be really sure, the files now exist in the Kudu editor:
Summary
There you go, a complete example of setting up your first GitHub Actions Workflow for pushing a .NET Core application into an Azure App Service. The set of actions I used also has options for deploying to a deployment slot as well, witch makes it complete! If this is the first time you use yaml, this can look a bit daunting, but after reading what is happening, I figured everything out as well!
Next up is seeing if we can parameterize this yaml file and deploy to different web applications (for example staging) with the same template. That’s something for another time!